
ISO 15143-4 (AEMP 2.0) API Access Guide
ISO 15143-3 (AEMP 2.0) API
Assumptions
-
API consumer has entered into a valid Digital Marketplace Agreement.
-
API consumer has received client credentials (Client ID and Client Secret).
-
API consumer has valid Corporate Web Security (CWS ID -Username and Password).
-
API consumer is subscribed to the API and will use the API only in accordance with the Digital Marketplace Agreement and Licenses to APIs.
Communications
| Sr. No | Sender |
Subject
|
Purpose |
|---|---|---|---|
| 1 | DigitalMarketplaceTeam@cat.com | ** SAVE this Email ** – These Credentials are key to accessing your recent Client credentials and secret request for ISO 15143-3 (AEMP 2.0) API | Email contains client credentials to access ISO 15143-3 (AEMP 2.0) API (to access the API via Postman or other integration) |
| 2 | donotreply@cat.com | Your subscription to the ISO 15143-3 (AEMP 2.0) API product has been activated. | Email confirms subscription of ISO 15143-3 (AEMP 2.0) API |
Access ISO 15143-3 (AEMP 2.0) API – Postman
Pre-requisites:
| What is needed | How to get it |
|---|---|
| API Client Credentials (Client ID and Client Secret) | From Caterpillar |
| Postman tool installed in your desktop / PC | https://www.postman.com/downloads/ |
|
Postman collection for ISO 15143-3 (AEMP 2.0) [Postman collection is a set of JSON files] |
From Caterpillar |
Import ISO API Postman Collection
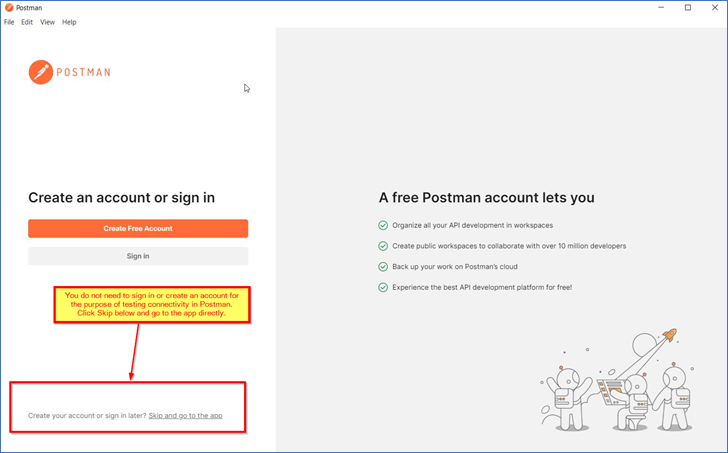
Step 1: You can click on “Skip and go to the app” to import the Postman collections.*
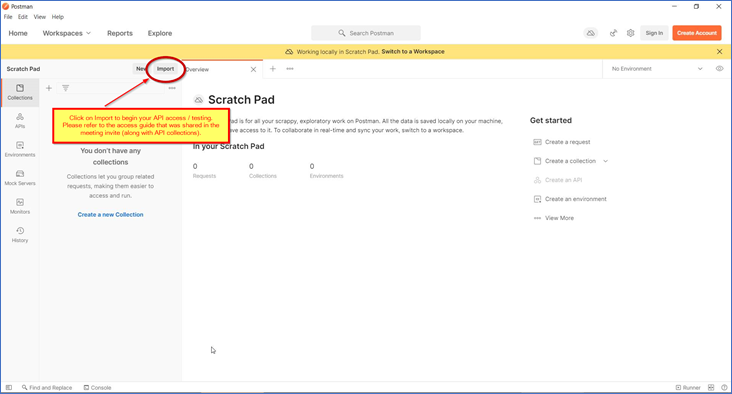
Step 2: Click on the Import button.
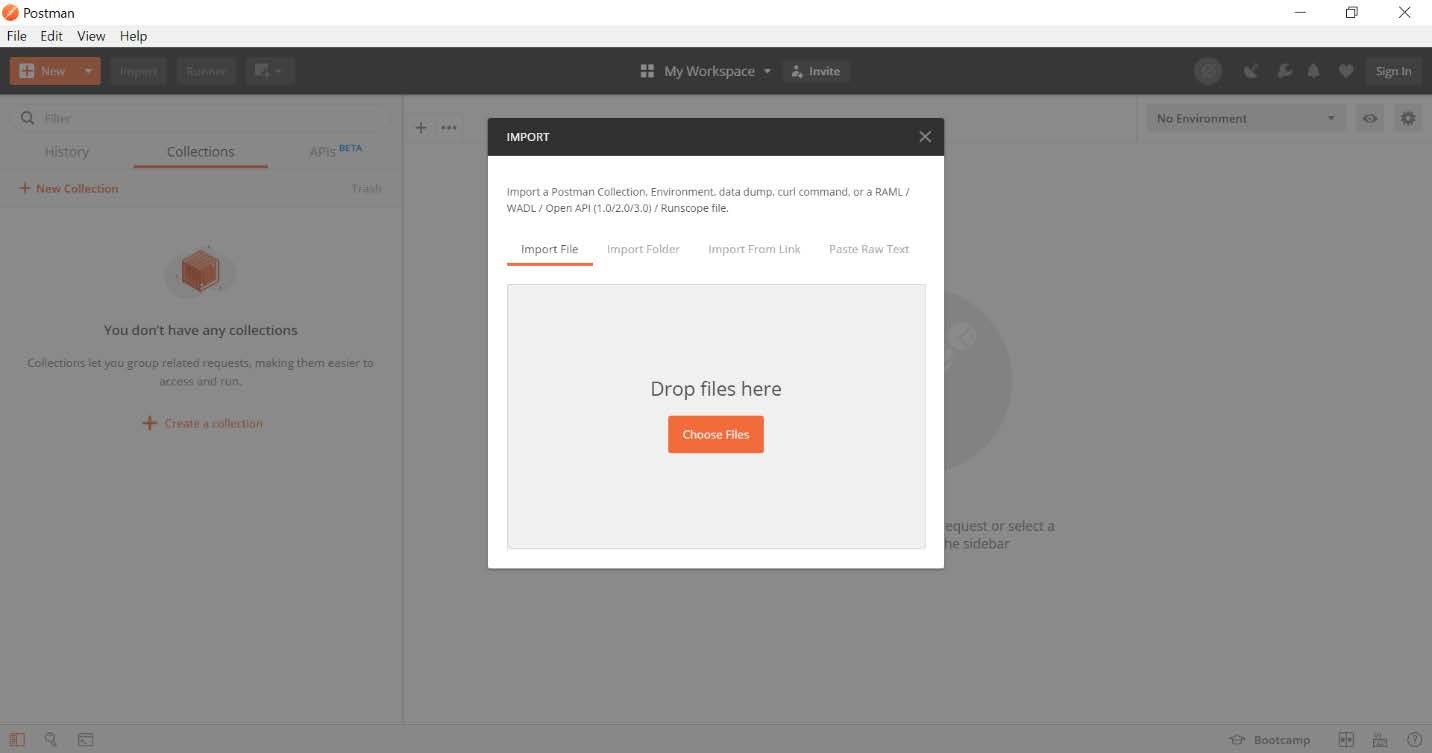
Step 3: Following popup window will open: Click on “Choose Files” button.
Step 4: Select postman collection obtained from Caterpillar Adoption Team (with the meeting invitation).
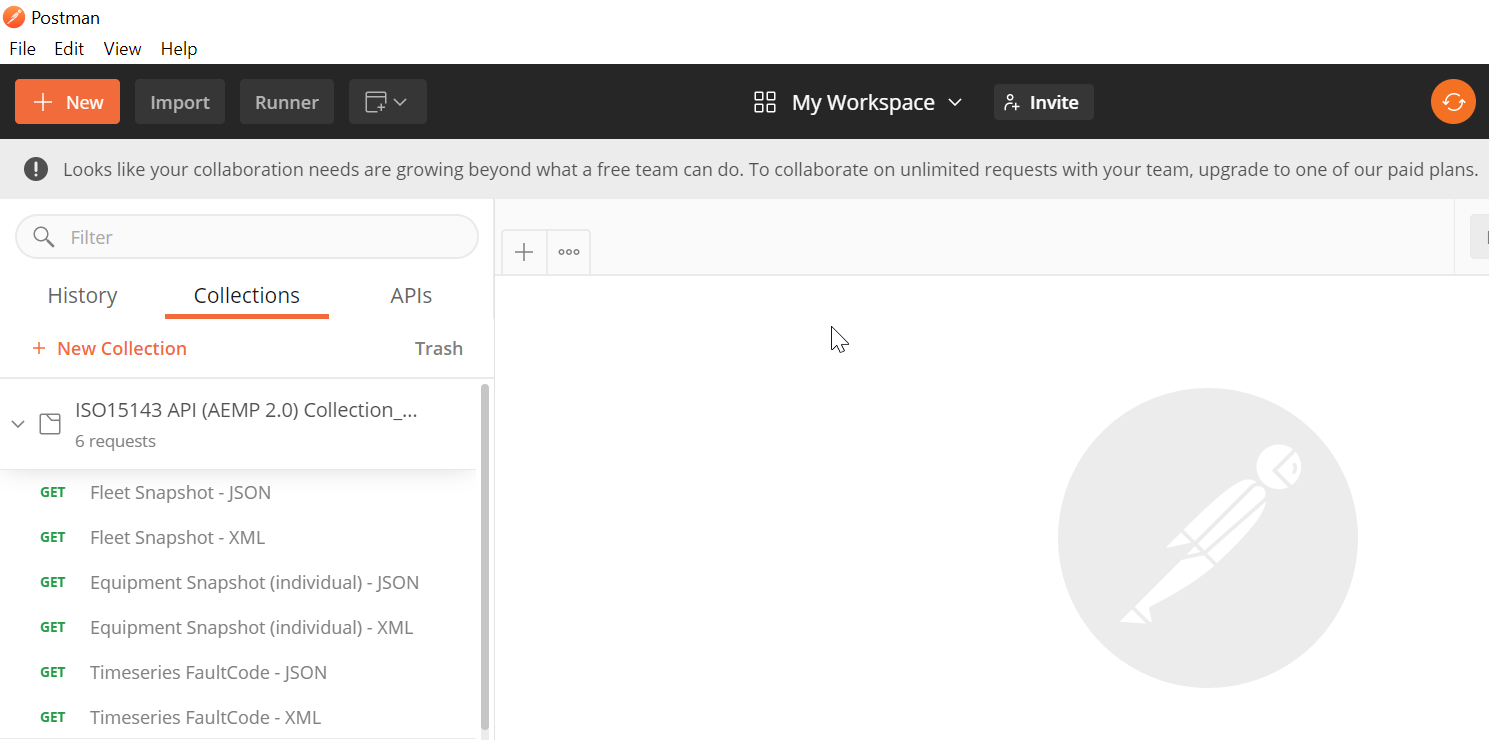
Step 5: On successful import you can see ISO 15143-3 (AEMP 2.0) API request as follows:
Get OAuth 2.0 Access Token
Step 1: Select Fleet snapshot from the ISO 15143-3 (AEMP 2.0) API from collection and go to the “Authorization” tab and select OAuth 2.0.
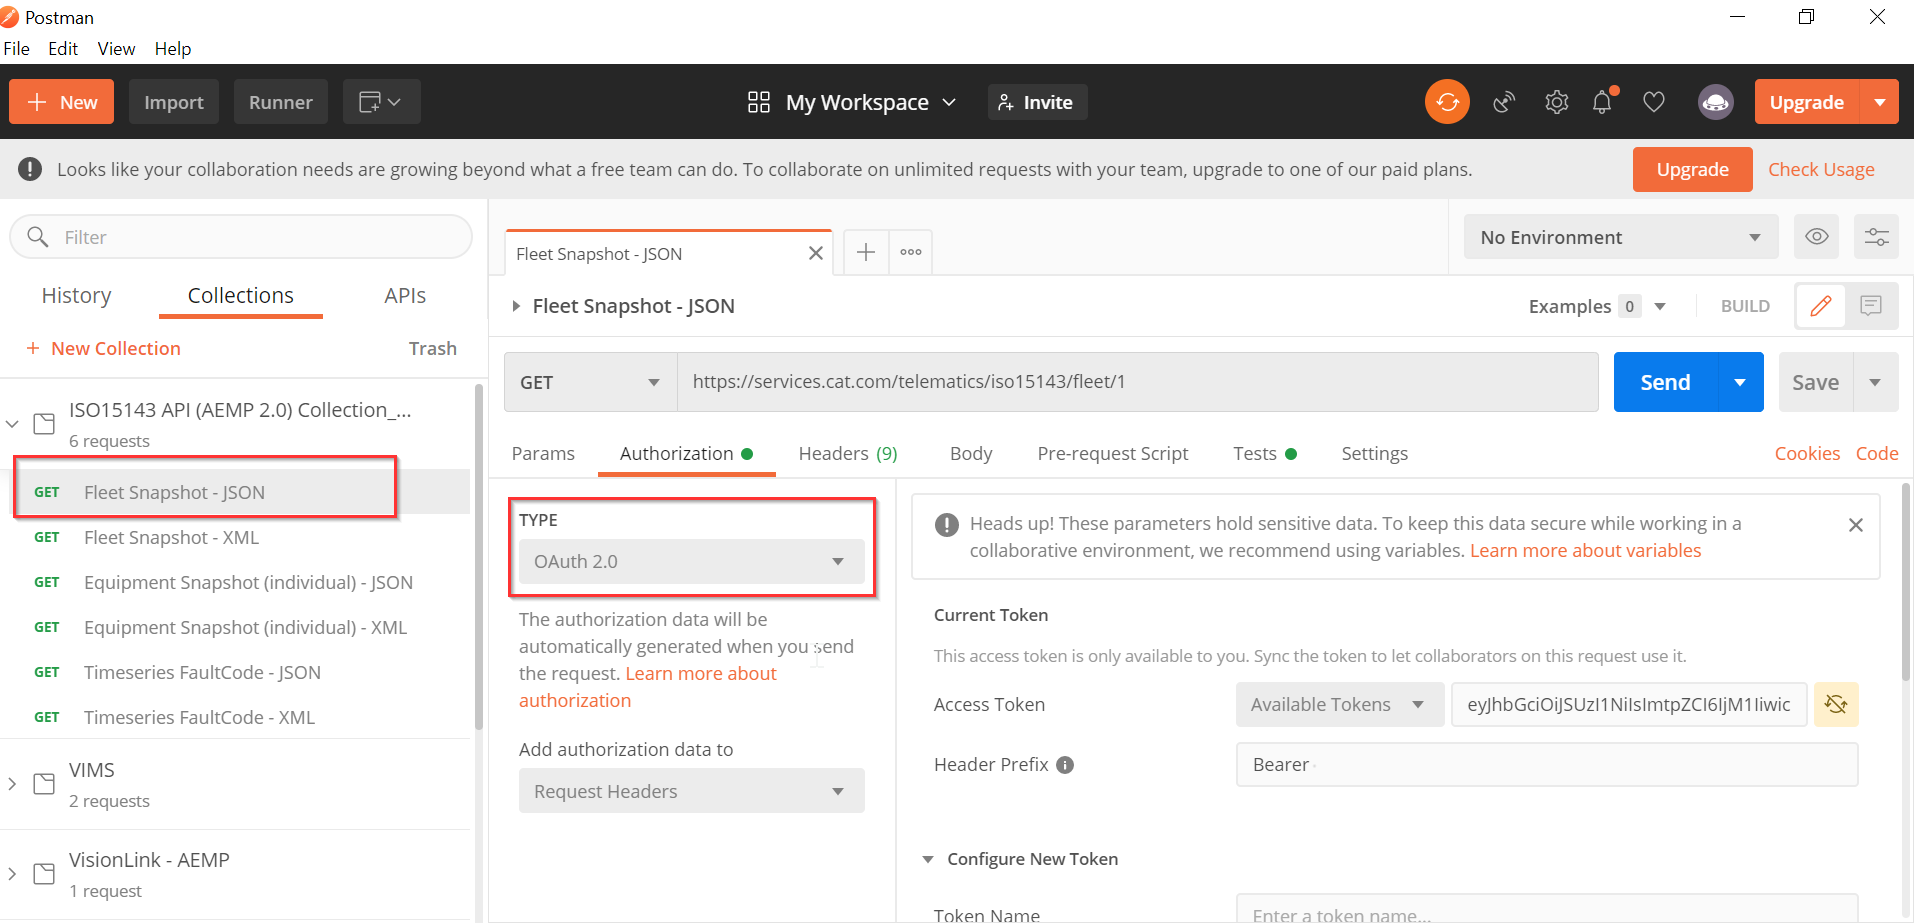
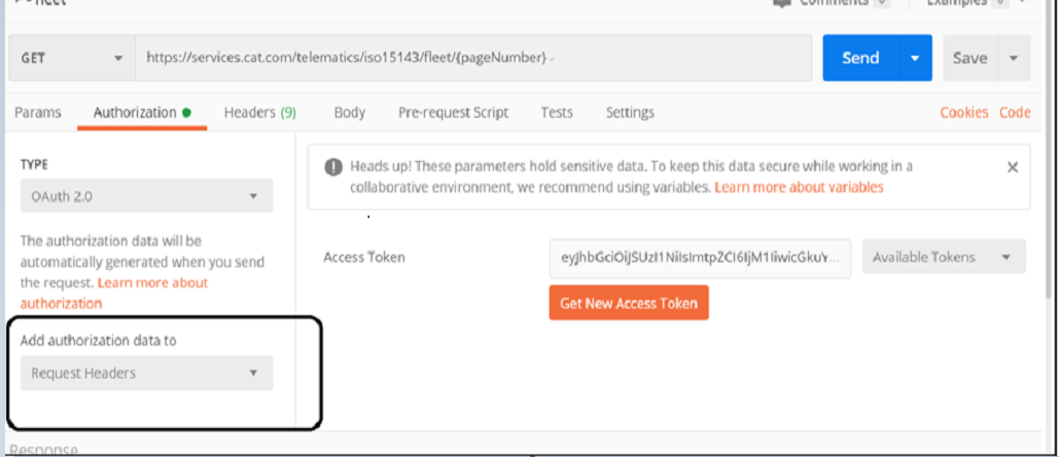
Step 2: Select “Request Headers” from drop down as shown in the screen below:
Note: This will add the Authorization field in the header.
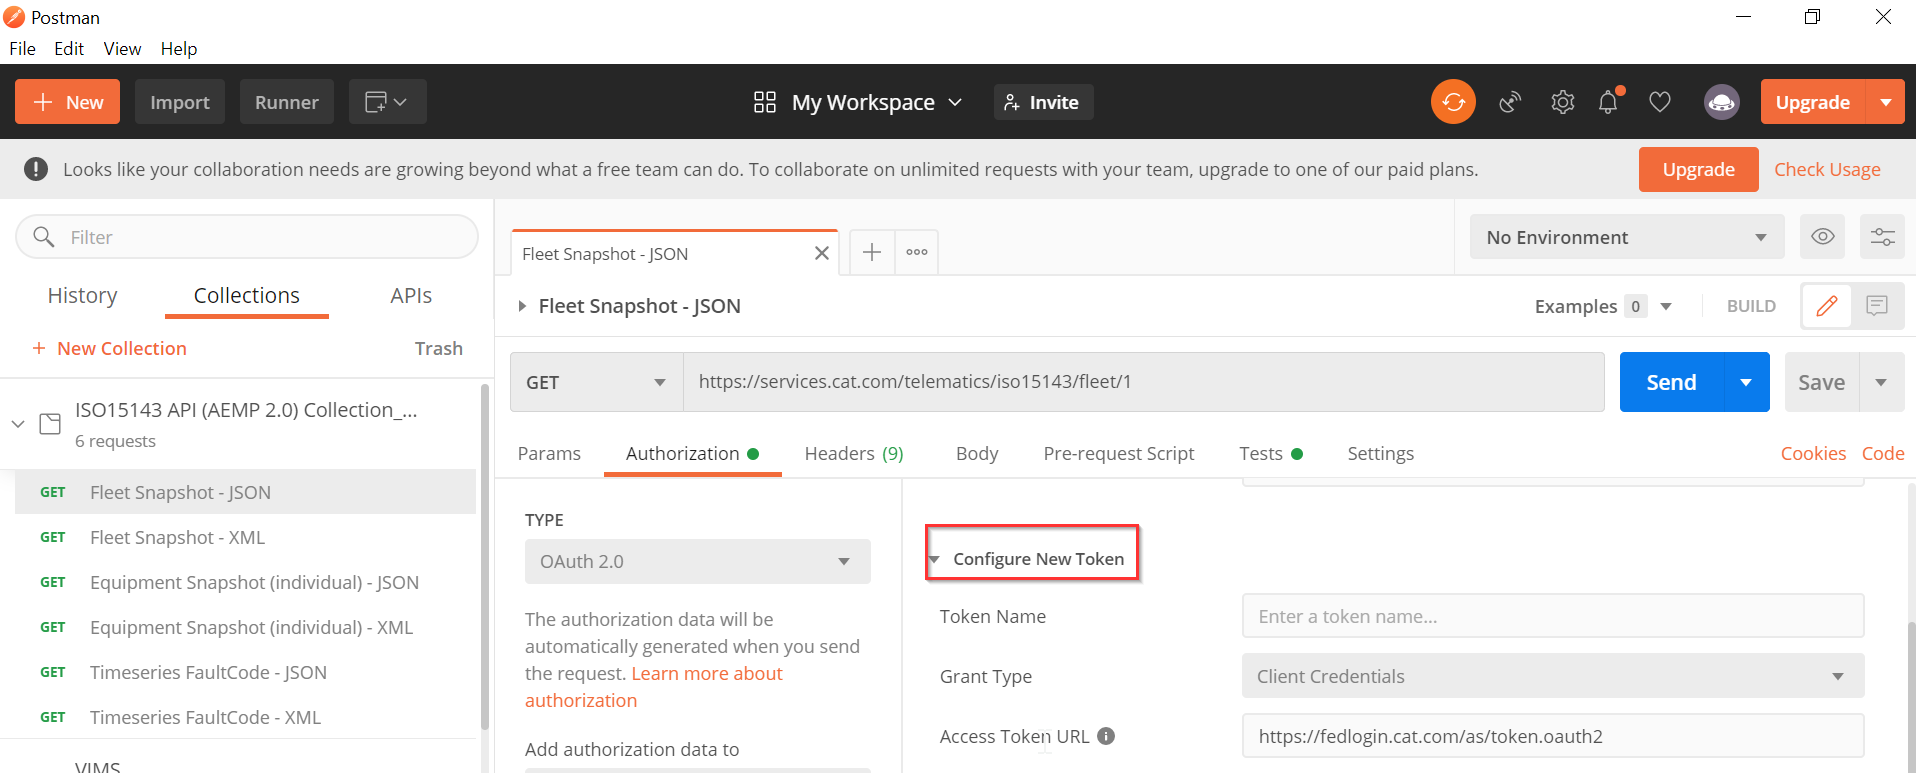
Step 3: Select the “Configure new token” option.
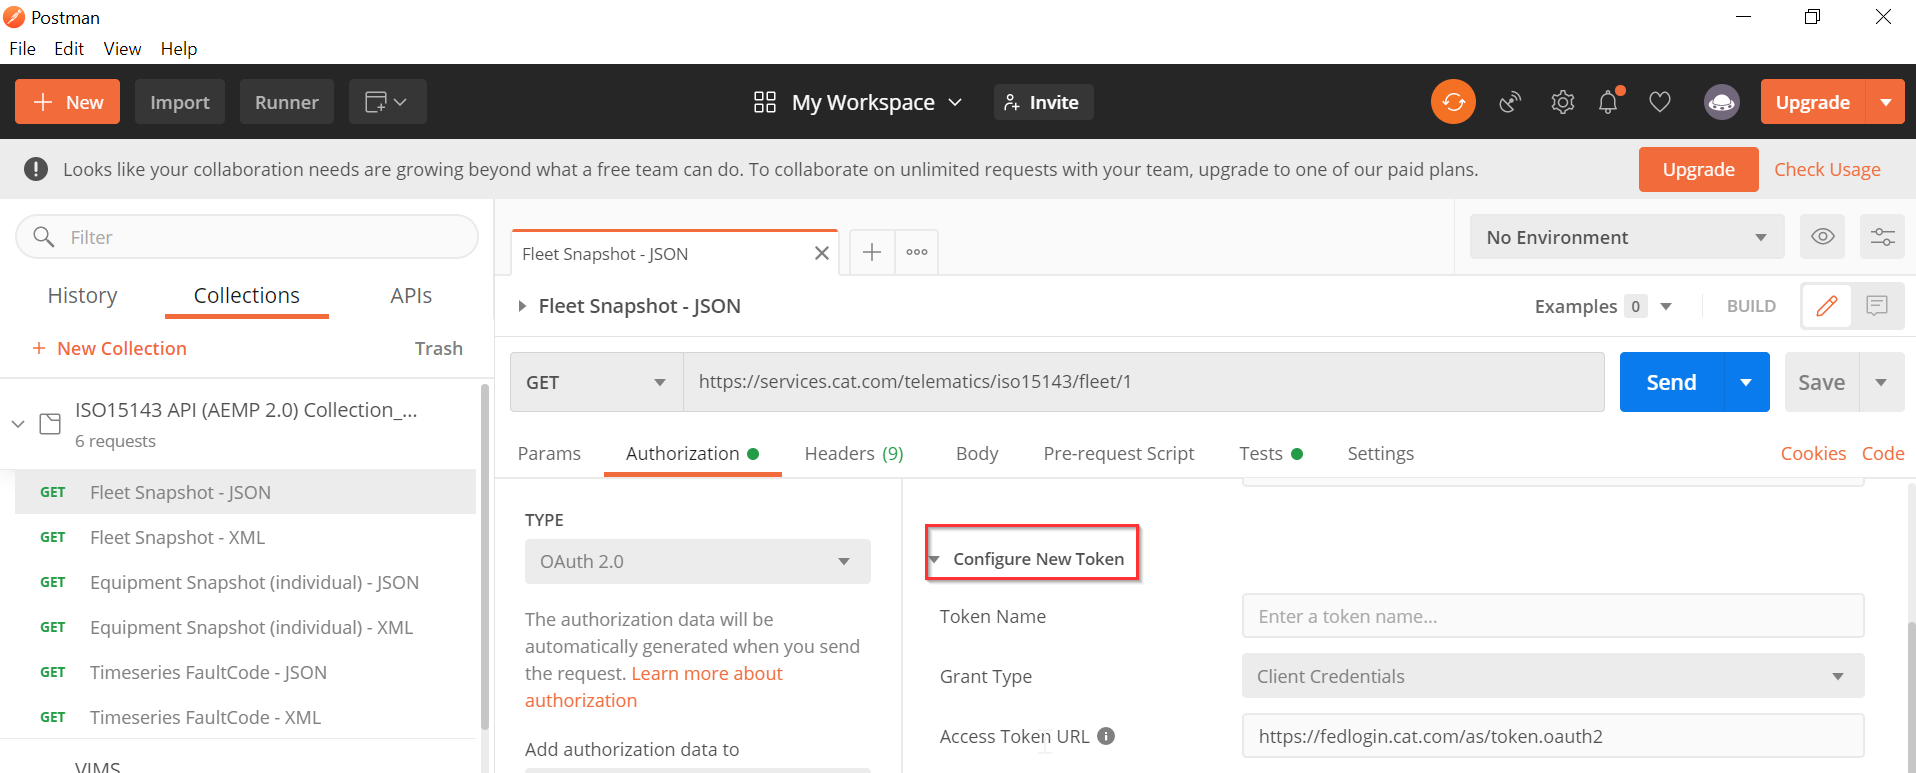
Step 4: Enter the below details under “Configure new token” and click on “Get New Access Token” button as shown below:
|
Field |
Value |
|---|---|
|
Token Name |
Enter a name for the token (this is just for your reference) |
|
Grant Type |
Choose “Client Credentials” |
|
Access Token URL |
https://fedlogin.cat.com/as/token.oauth2 |
|
Client Id |
Enter Client Id (Please get in touch with credential owner) |
|
Client Secret |
Enter Client Secret (Please get in touch with credential owner) |
|
Client Authentication |
Select “Send as Basic Auth Header” from dropdown |
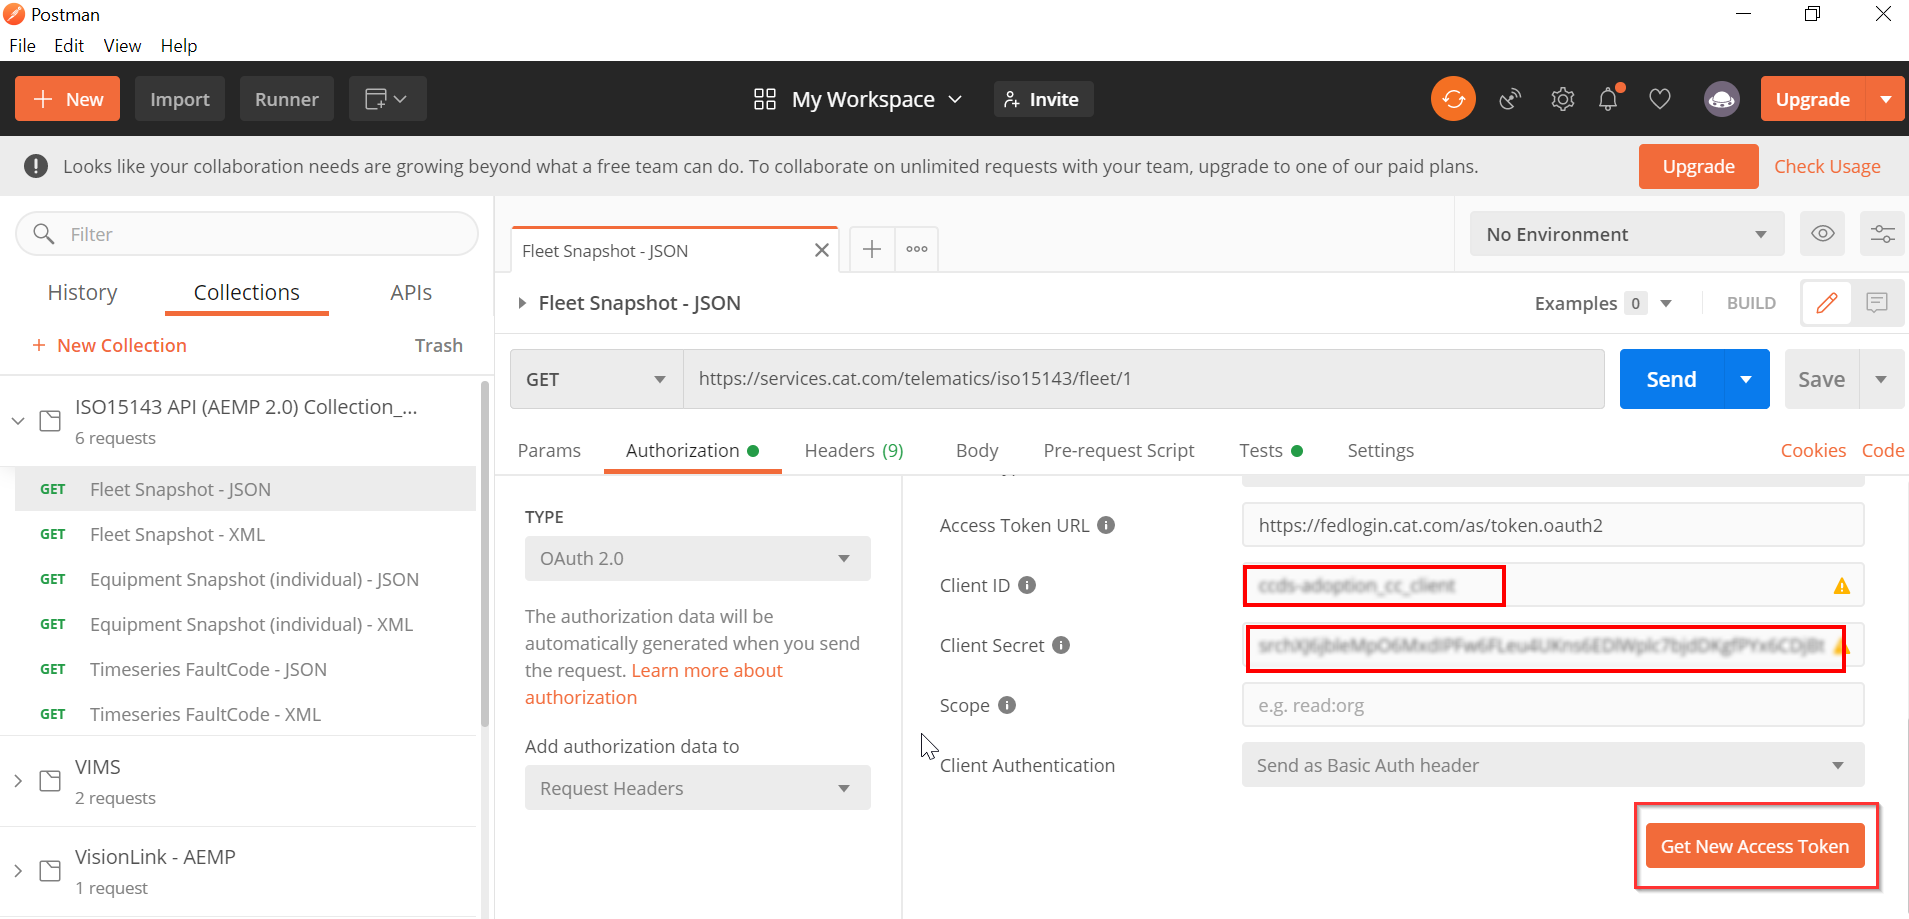
Step 5: The following window will display the new access token:
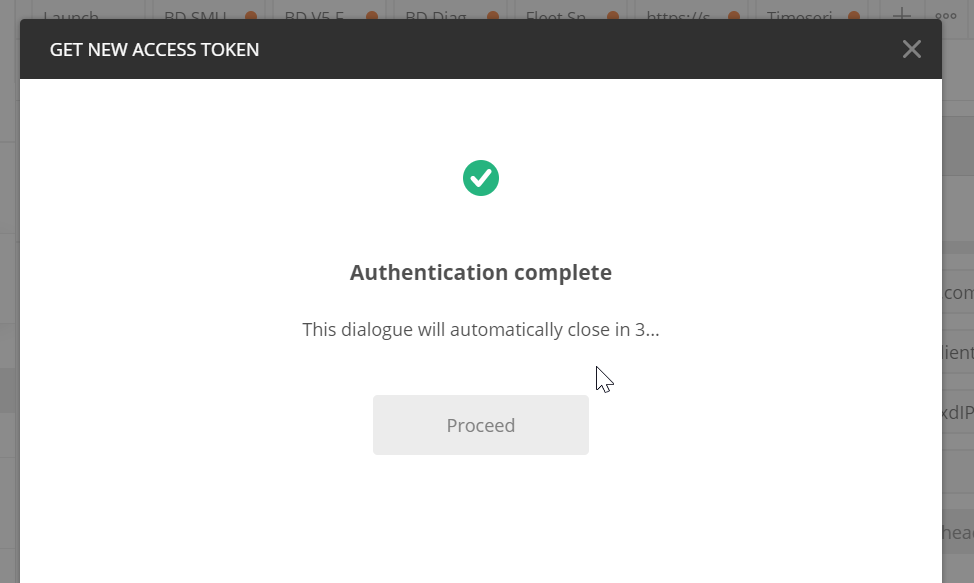
Step 6: Click “USE TOKEN”.
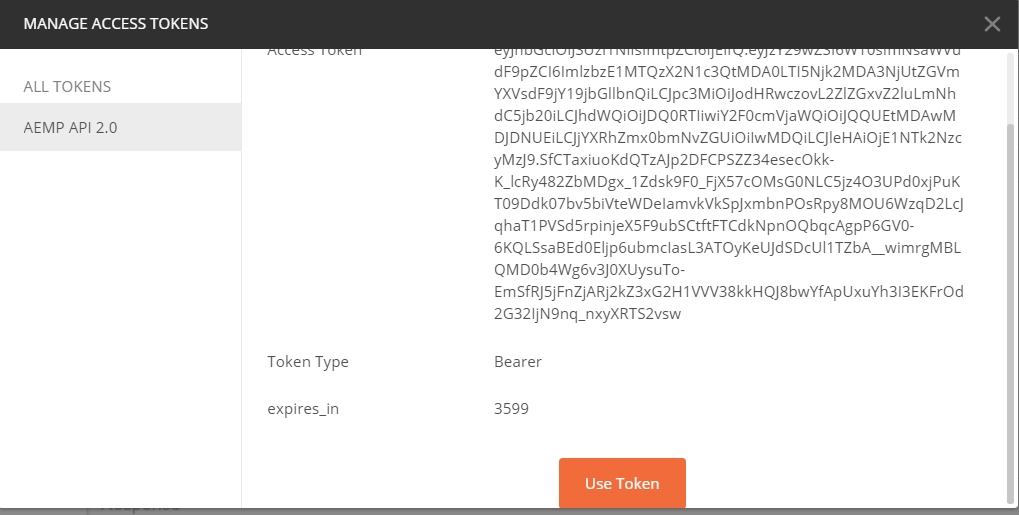
Note: This will add the Authorization field in the header
Fleet Snapshot API
Step1: To obtain the Fleet Snapshot Data in XML Format.
Endpoint URL:
https://services.cat.com/telematics/iso15143/fleet/{pageNumber}
Example:
The URL for Fleet Snapshot data in XML format would be:
https://services.cat.com/telematics/iso15143/fleet/1
Header:
Accept: application/iso15143-snapshot+xml
Parameter:
1 {PageNumber}
Screens from Postman:


Step 2: Repeat the Authorization step from section 3.2.
Step 3: Click SEND. Screen shot of the response:
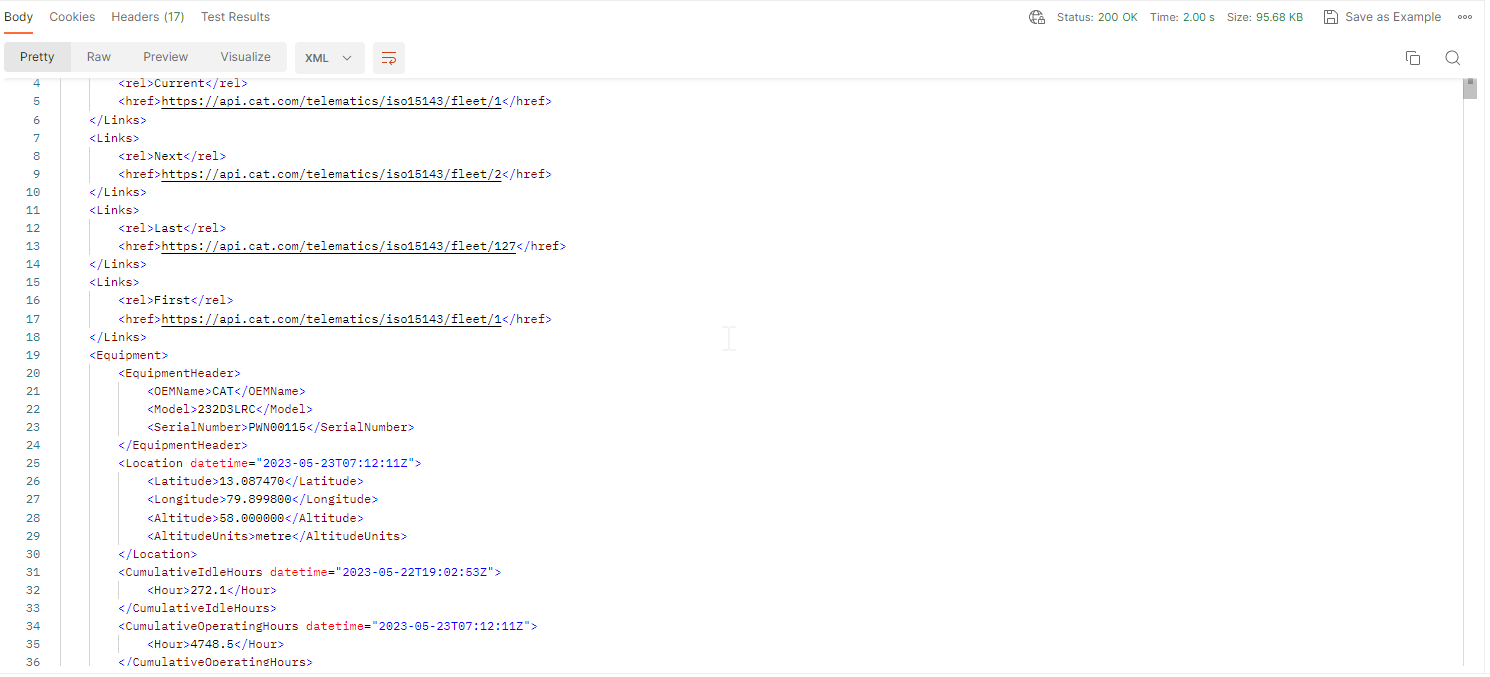
Step 4: Fleet Snapshot Data in JSON Format.
NOTE: Follow the same steps from this Section, but change “Accept Type” in header to “application/iso15143-snapshot+json”.
Equipment Snapshot API
Step 1: To obtain the Equipment Snapshot Data in JSON Format:
Endpoint URL:
Example: To get the Equipment Snapshot data for the following asset in JSON format.
Make: CAT
Model: MH3026
Serial Number: FB999999
Equipment Snapshot URL:
https://services.cat.com/telematics/iso15143/fleet/equipment/makeModelSerial/CAT/MH3026/FB999999
Header:
Accept: application/iso15143-snapshot+json
Screens from Postman:


Step 2: Repeat the Authorization step from section 3.2.
Step 3: Click SEND. See the response:
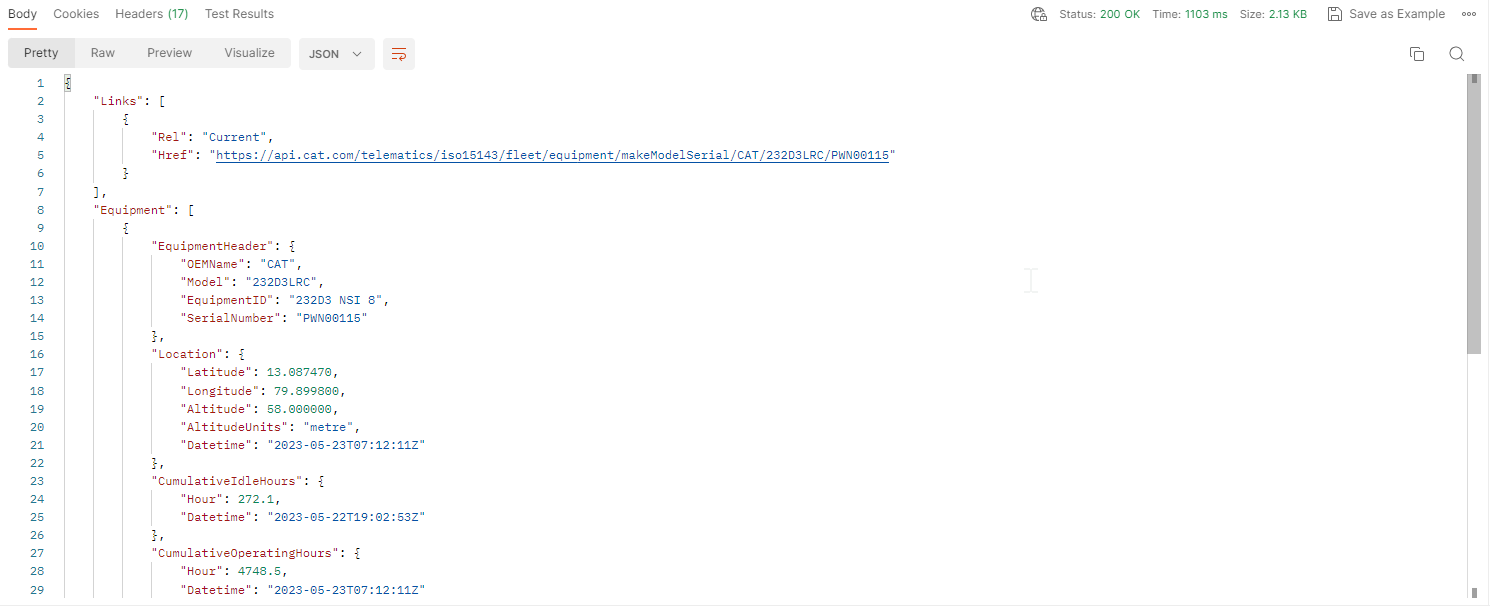
Step 4: Equipment Snapshot Data in XML Format:
Follow the same steps from this Section, but change “Accept Type” in header to “application/iso15143-snapshot+xml”.
Timeseries Fault Code API
Step 1: To obtain the Timeseries Fault Code Data in JSON Format:
Endpoint URL:
Example: To get the Timeseries Fault Code data for the following asset in XML format:
Make: CAT
Model: MH3026
Serial Number: FB999999
startDateUTC : 2019-05-07T00:00:00Z
endDateUTC: 2019-05-17T00:00:00Z
pageNumber = 1
Timeseries Fault code URL:
Header:
Accept: application/iso15143-faults+ json
Screens from Postman:


Step 2: Repeat the Authorization step from section 3.2.
Step 3: Click SEND. See example below:
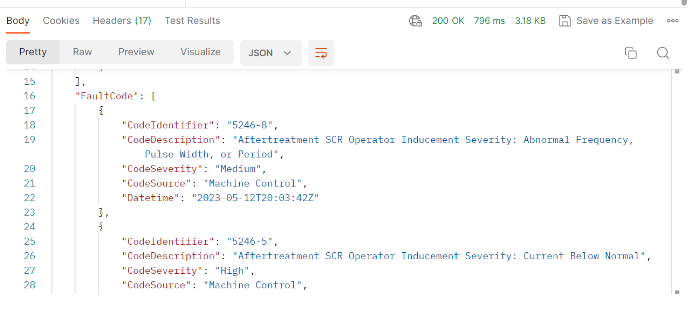
Step 4: Timeseries Fault Code Data in XML Format:
Follow the same steps in this Section, but change “Accept Type” in header to “application/iso15143-faults+xml”.
Timeseries Location API
Step 1: To obtain the Timeseries Location in XML Format:
Endpoint URL:
Example: To get the Asset location data for the following asset in XML format:
Make: CAT
Model: 930K
Serial Number: DYB64103
startDateUTC : 22-12-12T00:00:00Z
endDateUTC: 2022-12-21T00:00:00Z
pageNumber = 1
Timeseries Locations URL:
Header:
Accept: application/xml
Screens from Postman:

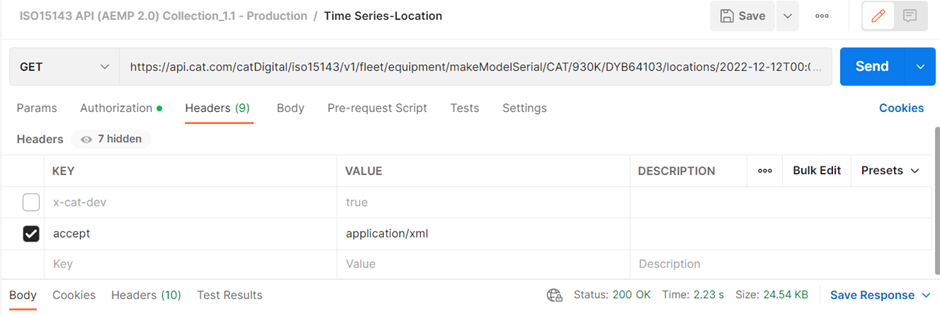
Step 2: Repeat the Authorization step from section 3.2.
Step 3: Click SEND. See example below:
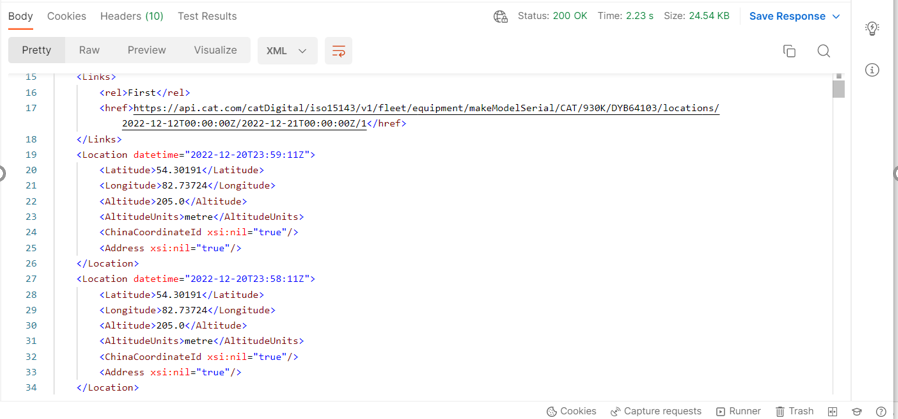
Step 4: Timeseries Location Data in JSON Format:
Follow the same steps in this Section, but change “Accept Type” in header to “application/json.
Timeseries Switch Status API
Step 1: To obtain the Timeseries Switch status Data in XML Format:
Endpoint URL:
Example: To get the Timeseries switch status data for the following asset in XML format:
Make: CAT
Model: C9.3
Serial Number: RFS45659
startDateUTC : 2022-12-12T00:00:00Z
endDateUTC: 2022-12-21T00:00:00Z
pageNumber = 1
Timeseries switch status URL:
Header:
Accept: application/xml
Screens from Postman:


Step2: Repeat the Authorization step from section 3.2.
Step3: Click SEND. See example.
Important! The API is currently available only to a limited group of pilot users. The API availability to dealers at large will be announced after the pilot completion.
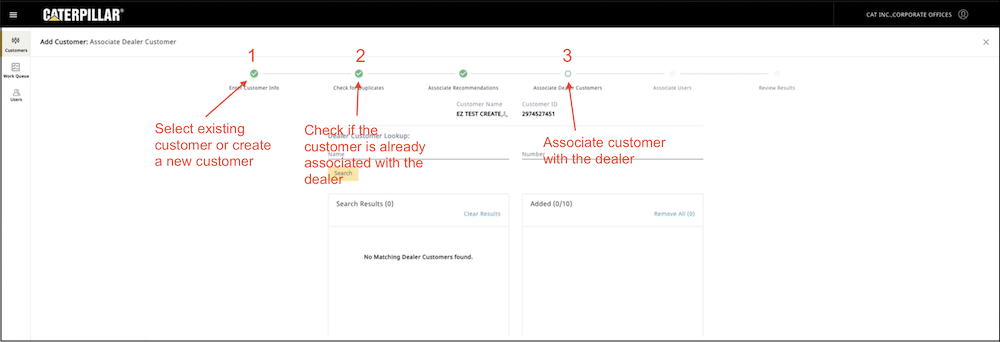
The Dealer ERP Customer Master API allows dealers to integrate their ERP systems with Caterpillar Customer Master by sending their customer data to Caterpillar in near real time. The API provides the same capabilities to create customers and associate them with dealerships as the Customer Admin Tool web application (https://mycustomer.cat.com).
Security
The API uses the OAuth 2.0 protocol for authorization. In order to access the API, an OAuth access token is required in the request headers of each API call. A valid OAuth client ID and client secret is required to obtain an OAuth access token.
The following basic information is required to authenticate and generate the token.
| Field | Value |
|---|---|
| Grant Type | Set this to client_credentials. |
| Token URL | Production: https://fedlogin.cat.com/as/token.oauth2 QA: https://fedloginqa.cat.com/as/token.oauth2 |
| Client ID | Your application's Client ID. Contact your credentials owner. |
| Client Secret | Your application's Client Secret. Contact your credentials owner. |
An OAuth token expires after 60 minutes. An expired token will need to be replaced with a new token.
Additional OAuth information can be found in the Caterpillar OAuth 2.0 Documentation.
API Environments
The API is available in QA and production environments:
- QA: https://services-int.cat.com/catDigital/customerMaster/dealerErp/v1
- Production: https://services.cat.com/catDigital/customerMaster/dealerErp/v1
API Reference Information
Detailed reference information about the API input parameters, request bodies, responses, and error messages can be found in the Dealer ERP Customer Master API reference documentation
Workflow
Caterpillar Customer Master is the Caterpillar database of customers associated with dealers.
A customer organization represents a customer that can be associated with multiple dealers.
A dealer customer is an instance of a customer organization associated with a specific dealer (dealer code). A dealer customer is identified by the combination of a dealer code and DCN (dealer customer number) joined with a pipe (|), for example, "TD68|245TRSSDG343456.
Use the Dealer ERP Customer Master API to associate a new or existing customer organization with a dealer (single dealer code). The workflows is as follows:
- When the API user submits the request, a search is performed to find the customer organization in the customer master database.
- API uses following search criteria to find the org (all must match):
- Customer organization name is similar to input string
- Country code matches to the input value
- Address1 field is similar to input string
- Postal code is similar to input value OR city name and state match input values
- If the customer organization is not found in the database, the customer organization is created using
businessName,alternateName, address, email, and phones with the status ofACTIVE. - If a customer organization is found, it will be associated with the specified dealer code.
- API uses following search criteria to find the org (all must match):
- When a customer organization is associated the specified dealer code, the resulting DCN (
dealerCodeanddealerCustomerNumbercombination) is validated against in the customer master database.- If the DCN exists and is not associated to any customer organization, then an association is created with the provided
customerOrganizationIdentifierand the DCN and a 200 response is returned. - If the DCN exists in the customer master database and is associated to any customer organization, a 400 response code is returned.
- If the DCN does not exist in the database, then the dealer customer is created using
businessName,alternateName,dealerCustomerNumber,dealerCode,dealerType=REVENUE(by default), address, email, phones attributes and associated to customer organization.
- If the DCN exists and is not associated to any customer organization, then an association is created with the provided
- To associate the customer organization with additional dealer codes, submit additional requests using the
customerOrganizationIdentifierreturned by the original call. See examples below.
Add a Customer to a Dealer
Use the POST /dealerCustomers/associate endpoint to add a customer to a dealer (i.e., create a dealer customer by associating a customer organization with a dealer code):
curl --location --request POST 'https://api-int.cat.com/catDigital/customerMaster/dealerErp/v1/dealerCustomers/associate' \ --header 'Authorization: Bearer {Bearer Token}' \ --header 'Content-Type: application/json' \ --data-raw '{ "businessName": "DIY Digging, Inc", "alternateName": "NW53655HGFD ALT", "dealerCustomerNumber": "245TRSSDG343456", "dealerCode": "TD68", "addresses": [ { "addressType": "MAIN OFFICE", "address1": "123 Park Lane", "address2": "", "address3": "", "countryCode": "USA", "stateOrProvinceCode": "IL", "subdivisionCode": "", "cityName": "Peoria", "postalCode": "61607" } ], "emails": [ { "emailAddress": "TRHW465@CAT.COM", "emailType": "PRIMARY" } ], "phones": [ { "phoneNumber": "+1 312-345-7535", "phoneType": "PRIMARY" } ]}'
To associate the customer organization with additional dealer codes, submit additional requests including the customerOrganizationIdentifier value from the response to the first request:
curl --location --request POST 'https://services.cat.com/customerMaster/dealerErp/v1/dealerCustomers/associate' --header 'Authorization: {Bearer Token}''{ "customerOrganizationIdentifier": "2974527631", "businessName": "DIY Digging, Inc", "alternateName": "Ajay Construction", "dealerCustomerNumber": "245TRSSDG343456", "dealerCode": "TD69", "addresses": [ { "addressType": "MAIN OFFICE", "address1": "123 Park Lane", "address2": "", "address3": "", "countryCode": "USA", "stateOrProvinceCode": "IL", "subdivisionCode": "", "cityName": "Peoria", "postalCode": "61607" } ], "emails": [ { "emailAddress": "TRHW465@CAT.COM", "emailType": "PRIMARY" } ], "phones": [ { "phoneNumber": "+1 312-345-7535", "phoneType": "PRIMARY" } ]}'
Request body
The following is a complete list of the required and optional request attributes.
Required
businessName: The customer organization or dealer customer business name represents the business name of the customer organization or dealer customer.dealerCustomerNumber: The unique identifier of the customer in the dealer ERP system. Dealer customer number is part of the DCN (dealerCodeanddealerCustomerNumbercombination) identifier.dealerCode: The Caterpillar-assigned dealer code derived from dealer ERP source system.addresses: Customer address. The address object passed in the request to dealer ERP customer master API must haveMAIN OFFICEaddress type. The address is NOT validated against a GIS database.
Optional
emails: Details of customer or dealer customer email object to be added for the customer.phones: Order the results in either ascending or descending order.customerOrganizationIdentifier: The unique identifier of the customer organization. Specify the value to associate the customer organization with additional dealer codes. You can get the value from a successful response to the initial API call.alternateName: The alternate business name of the customer organization or dealer customer.
Response
A successful (201) response is as follow:
{ "customerOrganization": { "customerOrganizationDetails": { "businessName": "DIY Digging, Inc", "alternateName": "Ajay Construction", "customerOrganizationIdentifier": "2974527631", "topLevelIndicator": true, "parentOrganizationIdentifier": "2974527631", "updateTime": "2023-04-03T20:05:17.947Z", "owningDealerCode": "TD68", "hasAssociatedDealerCustomers": true, "managedAccountIndicator": false, "status": "ACTIVE", "locked": false }, "addresses": [ { "address1": "123 Park Lane", "address2": null, "address3": null, "cityName": "Peoria", "stateOrProvinceCode": "IL", "postalCode": "61607", "countryCode": "USA", "addressType": "PRIMARY" } ], "phones": [ { "phoneNumber": "+1 312-345-7535", "phoneType": "PRIMARY" } ], "emails": [ { "emailAddress": "TRHW465@CAT.COM", "emailType": "PRIMARY" } ], "dealerCustomerAssociations": [ { "dealerCustomerIdentifier": "TD68|245TRSSDG343456" } ] }, "dealerCustomerOrganization": { "dealerCustomerDetails": { "dealerCode": "TD68", "dealerCustomerNumber": "245TRSSDG343456", "dealerCustomerBusinessName": "DIY Digging, Inc", "dealerCustomerAlternateName": "Ajay Construction", "dealerCustomerIdentifier": "TD68|245TRSSDG343456", "updateTime": "2023-04-03 20:05:18.403862757", "type": "REVENUE", "status": "ACTIVE" }, "dealerCustomerAddresses": [ { "address1": "123 Park Lane", "address2": null, "address3": null, "cityName": "Peoria", "stateOrProvinceCode": "IL", "postalCode": "61607", "countryCode": "USA", "addressType": "MAIN OFFICE" } ], "dealerCustomerPhones": [ { "phoneNumber": "+1 312-345-7535", "phoneType": "PRIMARY" } ], "dealerCustomerEmails": [ { "emailAddress": "TRHW465@CAT.COM", "emailType": "PRIMARY" } ] }}
An error response provides detailed information about the cause of the error:
{ "code": "400", "description": "Dealer Customer already has an associated customer organization."}
Testing Procedures
Note: Before testing the API, it is strongly recommended that you set up access to the Customer Admin Tool web application, if you don't already have it. You will be prompted to request access when you navigate to the application URL.
- Use the QA environment for testing.
- Test the API by passing a valid request. Use a valid dealer code and other request body attributes per the OpenAPI specification.
- To verify the result, check the response body and confirm that the customer is created successfully using the Customer Admin Tool web application.
- You can also use the Customer Admin Tool web application to delete the test data you create in the QA environment.
Additional Documentation
The following additional documentation is available as part of the Dealer ERP Customer Master:
- Postman collection: https://digital.cat.com/knowledge-hub/document/dealer-erp-customer-master-api-postman-collection
Change History
| Date | Author | Description of Change |
|---|---|---|
| 04-13-2023 | Andrei Essaoulov | Updated the guide for the pilot. |
| 03-10-2023 | Mikhail Gavrilov | New document. |


